Use the Data Assessment Dashboard
The Data Assessment Dashboard enables you to assess your data after processing using filters and concept search. When you modify the dashboard, the changes remain available until you log out. If you want to view the modified dashboard at a later time or if you want others to view it, save the current display.
Perform the following procedure to use the Data Assessment Dashboard.
-
In the Main Menu, select >.
-
You can filter the dashboard information using the following options in the left Filter pane.
-
File Status
-
Unique/Duplicate
-
Document State
-
Exception
-
-
File Information
-
Custodian
-
Parent Date
-
Family Count
-
Record Type
-
File Type Category
-
Extracted Text Size
-
Filter Job
-
PII Types Detected
-
-
Email Information
-
Recipient Count
-
Thread Inclusive
-
Domain Categories
-
Email Keyword Hits
-
-
-
In the Filter pane, click Apply.
-
The system enables this button only when you select a filter option that you did not apply.
-
-
To clear all filters that you applied in the Filter pane, in the Filter pane, click Reset.
-
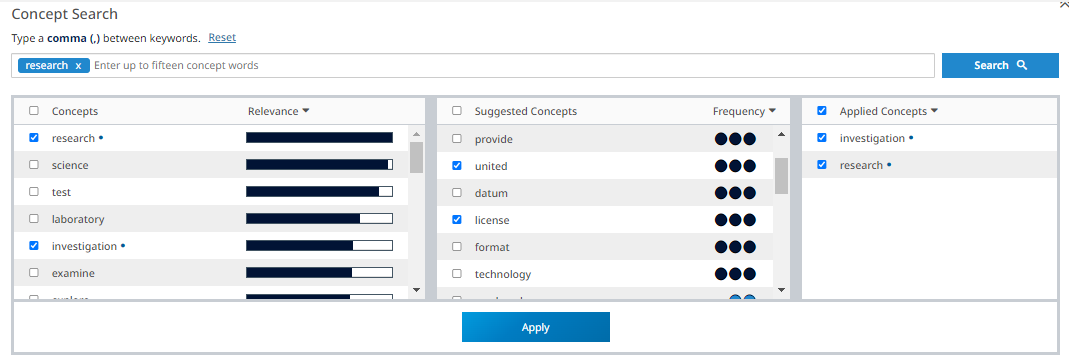
You can modify the dashboard using Concept Search. To modify the dashboard using the concept search results, perform the following actions.

-
In the Concept Search box, type up to 15 concept words, adding a comma between each concept word.
-
Click Search.
-
Review the concept words shown in the Concepts and Suggested Concepts tables.
In the Concepts table, each word shows a Relevance bar that indicates the relevancy of the concept matches.
The concept words in the Suggested Concepts table occur at the highest frequencies within the concept search hits. This table shows the top 25 results. Each word shows one of the Frequency indicators shown below. Frequency indicates the number of documents that hit on a specific word. The Frequency displayed is relative to the maximum of 25 results populated in the table.
-
High

-
Medium

-
Low

-
-
Select the concept words from Concepts or Suggested Concepts tables.
-
Click Apply. The applied concept words appear in the Applied Concepts table.
-
To clear all the filters that you applied in the Concepts and Suggested Concepts tables, click Reset.
-
-
You can sort the pivot table information using the following options. Use these fields to view a cross-reference between two different fields.
-
Group By
-
Custodian
-
Document State
-
Exception
-
Domain Categories
-
Email Keyword Hits
-
Record Type
-
File Type Category
-
PII Entities Likely
-
PII Entities Potential
-
Filter Job
-
-
Pivot On
-
Custodian
-
Document State
-
Exception
-
Domain Categories
-
Email Keyword Hits
-
Record Type
-
File Type Category
-
PII Entities Likely
-
PII Entities Potential
-
Filter Job
-
-
-
To save the current display, perform any of the following actions on the right pane. You can select the saved dashboard template from the template drop-down menu.
-
To save as a new dashboard template, perform the following actions.
-
Click Save View As.
-
Enter a name.
-
Click Save.
-
To save the changes that you make to selected dashboard template other than the default template, Click Save View.
-
To modify the dashboard template name other than the default template, perform the following actions.
-
Click the dashboard template drop-down menu and on the dashboard template name, click
 .
. -
In the Manage Template dialog box, in the Dashboard Template Name field, modify the template name.
-
Click Save.
-
-
-
To delete a saved dashboard template, perform the following actions.
-
Click the dashboard template drop-down menu and on the dashboard template name, click
 .
. -
In the Manage Template dialog box, click Delete Template.
-
Click Click to confirm you want to delete this template.
-
-
To export the pivot table details, at the top right of the pivot table, click Export.
-
To view the report, perform the following actions.
-
In the Main Menu, select Overview.
-
Click Jobs Overview.
-
Find your report in the job list, and click
 .
. -
When the XLSX file appears at the bottom of the page, select it to view the report in Excel. Alternatively, you can access the file via your Windows Download folder.
-
-
To promote the documents displayed in the pivot table, perform the following procedure. This option enables you to promote only the unique documents that you did not promote.
-
At the top right of the pivot table, click Promote.
-
In the Promote Documents dialog box, enter a name in Job Name and then click Promote.
-
You can view the status of the promotion job in the Jobs Overview page.
-